
Use Python to Send Outlook Emails
Step by step tutorial to send notification email using Python
Goal
Apart from Microsoft Excel and PowerPoint, another commonly used office tool would be Outlook. I think everyone who has working experience would be familiar with the Outlook software. It is used to receive and send emails for communication.
In my past working experience, one of the pain points for my colleagues would be sending regular notification emails to clients or other working parties. They have to markdown in schedule or set alarm to remind themselves or etc.
And today, I am going to share with you guys how we can use Python to automate all these tedious and boring pieces of stuff. After reading this article, you would be able to
- automatically send the notification email.
- add the attachment to the email.
- place the image directly in the email body.
- design whatever format you wish such as font size, font colour, etc.
Background
Just like many people, I have to send the notification email regularly. In this tutorial, we use the currencies exchange prices as an example. Imagine I have to send the email every one hour to capture the snapshot of the prices for different currencies.

All codes and materials are uploaded to my GitHub. You can check and folk this repo to further study. =)
Preliminary Preparation
As you may observe, to send the above email, there are two attachments we have to generate.
- The spreadsheet records all the details of the currency prices.
- The snapshot image shows the currencies with the largest changes.
At the moment, you may feel confused about how we can have those materials automatically prepared, right? The answer is simple. We also automate the process of preparing those things!
Don’t panic. I have already made all the step-by-step tutorials for you guys to easily follow. From the following articles, you will equip yourself with all the techniques to generate those spreadsheets and images.
Excel Spreadsheet (GitHub Repo: link)
Step by step tutorial to format the Excel spreadsheet using Pythontowardsdatascience.com
PowerPoint Slide Image (GitHub Repo: link)
Email Automation
Alright, it’s time for the most exciting part. As usual, below is the full code and the following would be the one-by-one explanation.
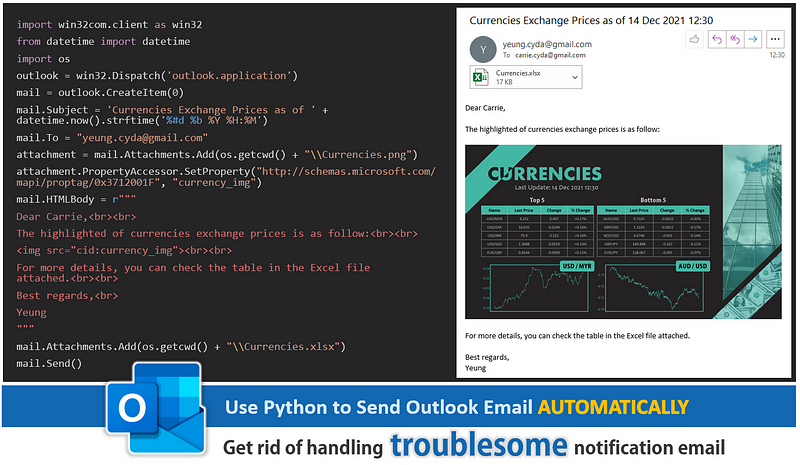
import win32com.client as win32
from datetime import datetime
import os
outlook = win32.Dispatch('outlook.application')
mail = outlook.CreateItem(0)
mail.Subject = 'Currencies Exchange Prices as of ' + datetime.now().strftime('%#d %b %Y %H:%M')
mail.To = "yeung.cyda@gmail.com"
attachment = mail.Attachments.Add(os.getcwd() + "\\Currencies.png")
attachment.PropertyAccessor.SetProperty("http://schemas.microsoft.com/mapi/proptag/0x3712001F", "currency_img")
mail.HTMLBody = r"""
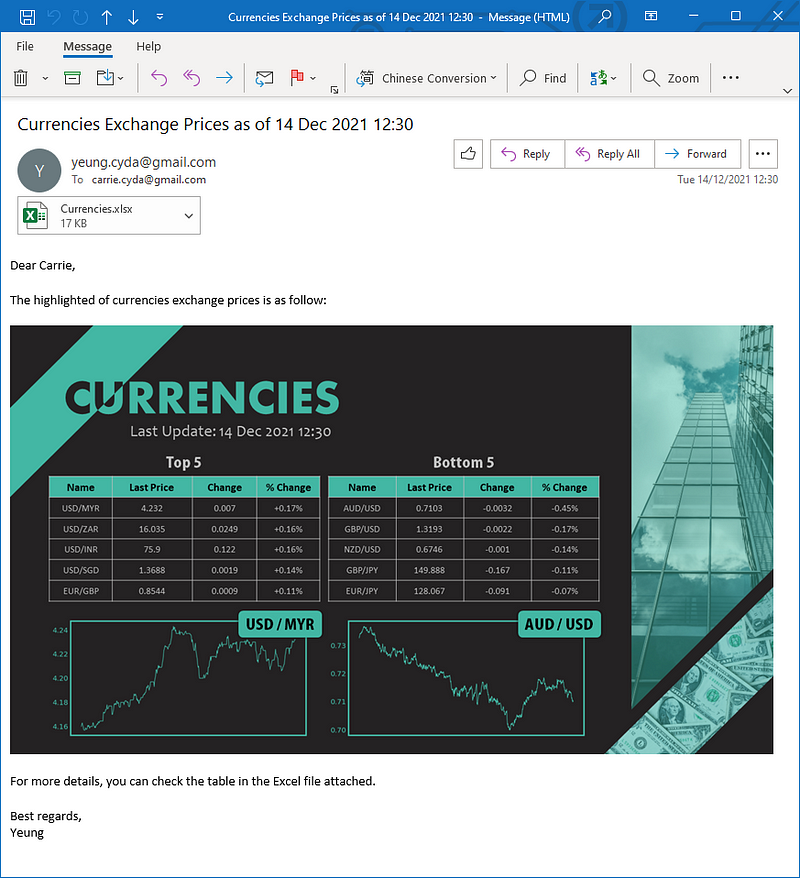
Dear Carrie,<br><br>
The highlighted of currencies exchange prices is as follow:<br><br>
<img src="cid:currency_img"><br><br>
For more details, you can check the table in the Excel file attached.<br><br>
Best regards,<br>
Yeung
"""
mail.Attachments.Add(os.getcwd() + "\\Currencies.xlsx")mail.Send()
1. Create the new Email
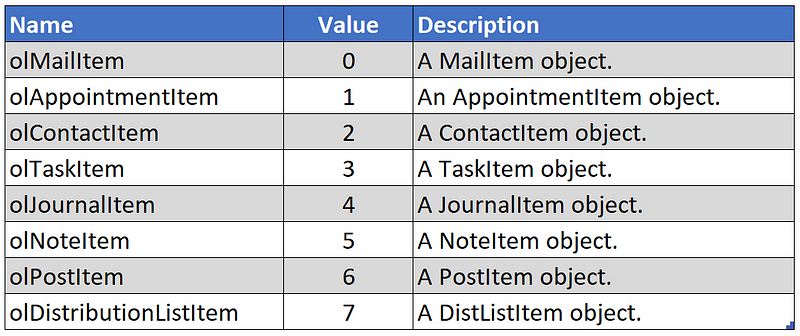
The code is simple and easy to understand. First, we specify our application to be outlook. Second, we create the mail object by setting parameter to be 0.
outlook = win32.Dispatch('outlook.application')
mail = outlook.CreateItem(0)
Just for your reference, different values would correspond to different objects.
2. Specify the Email properties
There are many properties that can be specified for the Email and below I have listed out some of the commonly used ones for reference.

2.1 Set the Email Subject
Here I have added the current date time to the Email subject since I have to regularly deliver the Email and having a unique time can help better tracking.
mail.Subject = 'Currencies Exchange Prices as of ' + datetime.now().strftime('%#d %b %Y %H:%M')2.2 Set the Receiver Email
I only have one receiver here. If you need to add more receivers, you can separate the Emails with ;. Also, CC and BCC are also available by using properties mail.CC and mail.BCC.
mail.To = "carrie.cyda@gmail.com"
2.3 Add the Image
This part would be a little bit tricky. Since I am not attaching the image to the Email, what I am trying to do is to display the image directly in the Email body. Therefore, we have to further specify the referencing properties for the PropertyAccessor by the Namespaces. To check more about other namespaces, you can refer to this link. For your curiosity, the value of 0x3712001F is actually the PR_ATTACH_CONTENT_ID for Unicode defined by Microsoft Outlook.
Remark: currency_img is the content identification we specify for the image.
attachment = mail.Attachments.Add(os.getcwd() + "\\Currencies.png")
attachment.PropertyAccessor.SetProperty("http://schemas.microsoft.com/mapi/proptag/0x3712001F", "currency_img")
2.4 Write the Email Content
To write the Email body, I would suggest using mail.HTMLBody instead of mail.Body since you can easily edit the Email into your desired format by using the HTML tag. Just one quick note is that cid refers to content id. By specifying it to be currency_img, we can show the image in the Email body.
mail.HTMLBody = r"""
Dear Carrie,<br><br>
The highlighted of currencies exchange prices is as follow:<br><br>
<img src="cid:currency_img"><br><br>
For more details, you can check the table in the Excel file attached.<br><br>
Best regards,<br>
Yeung
"""
2.5 Add the Excel Attachment
To attach a file, we can simply use one code to do so.
mail.Attachments.Add(os.getcwd() + "\\Currencies.xlsx")
3. Send the Email
After specifying everything, we can now send out the Email by calling the method Send.
mail.Send()
In fact, there are much more methods for Outlook. In case you would like to do more other tasks, just for your information, the methods include but not limited to Close, Copy, Delete, Display, Forward, Move, PrintOut, Reply, ReplyAll, Save, SaveAs and etc.
Conclusion
That’s it. I hope you guys enjoy the tutorial. I am happy to tell that I have received some feedback saying that these kinds of office tips can benefit their works a lot and that is my purpose in making these tutorials. In the next article, I will share the trick of using Python to process PDF files. Stay tuned and happy coding. =)
Comments
Post a Comment